Category: Stories

  • Beyond the Loop: Using Harmonic Theory to Write Better Songs

    Beyond the Loop: Using Harmonic Theory to Write Better Songs

    Every producer eventually hits a wall where their beats sound “fine,” but they don’t feel “emotional.” The secret usually lies in the harmonic movement.

    By leveraging classic and popular chord progressions, like the soul-stirring I – VI – III – VII or the ubiquitous I – V – vi – IV—you tap into a mathematical language that listeners have responded to for decades. These sequences aren’t “cheating”; they are the structural beams of songwriting.

    To take your production to the next level, focus on “voice leading.” Instead of jumping your chords up and down the keyboard, keep the notes close together to create a smooth, sophisticated flow. Use your minor chords (like the $ii$ and $vi$) to create tension, and your major chords (the I, IV and V) to provide the payoff.
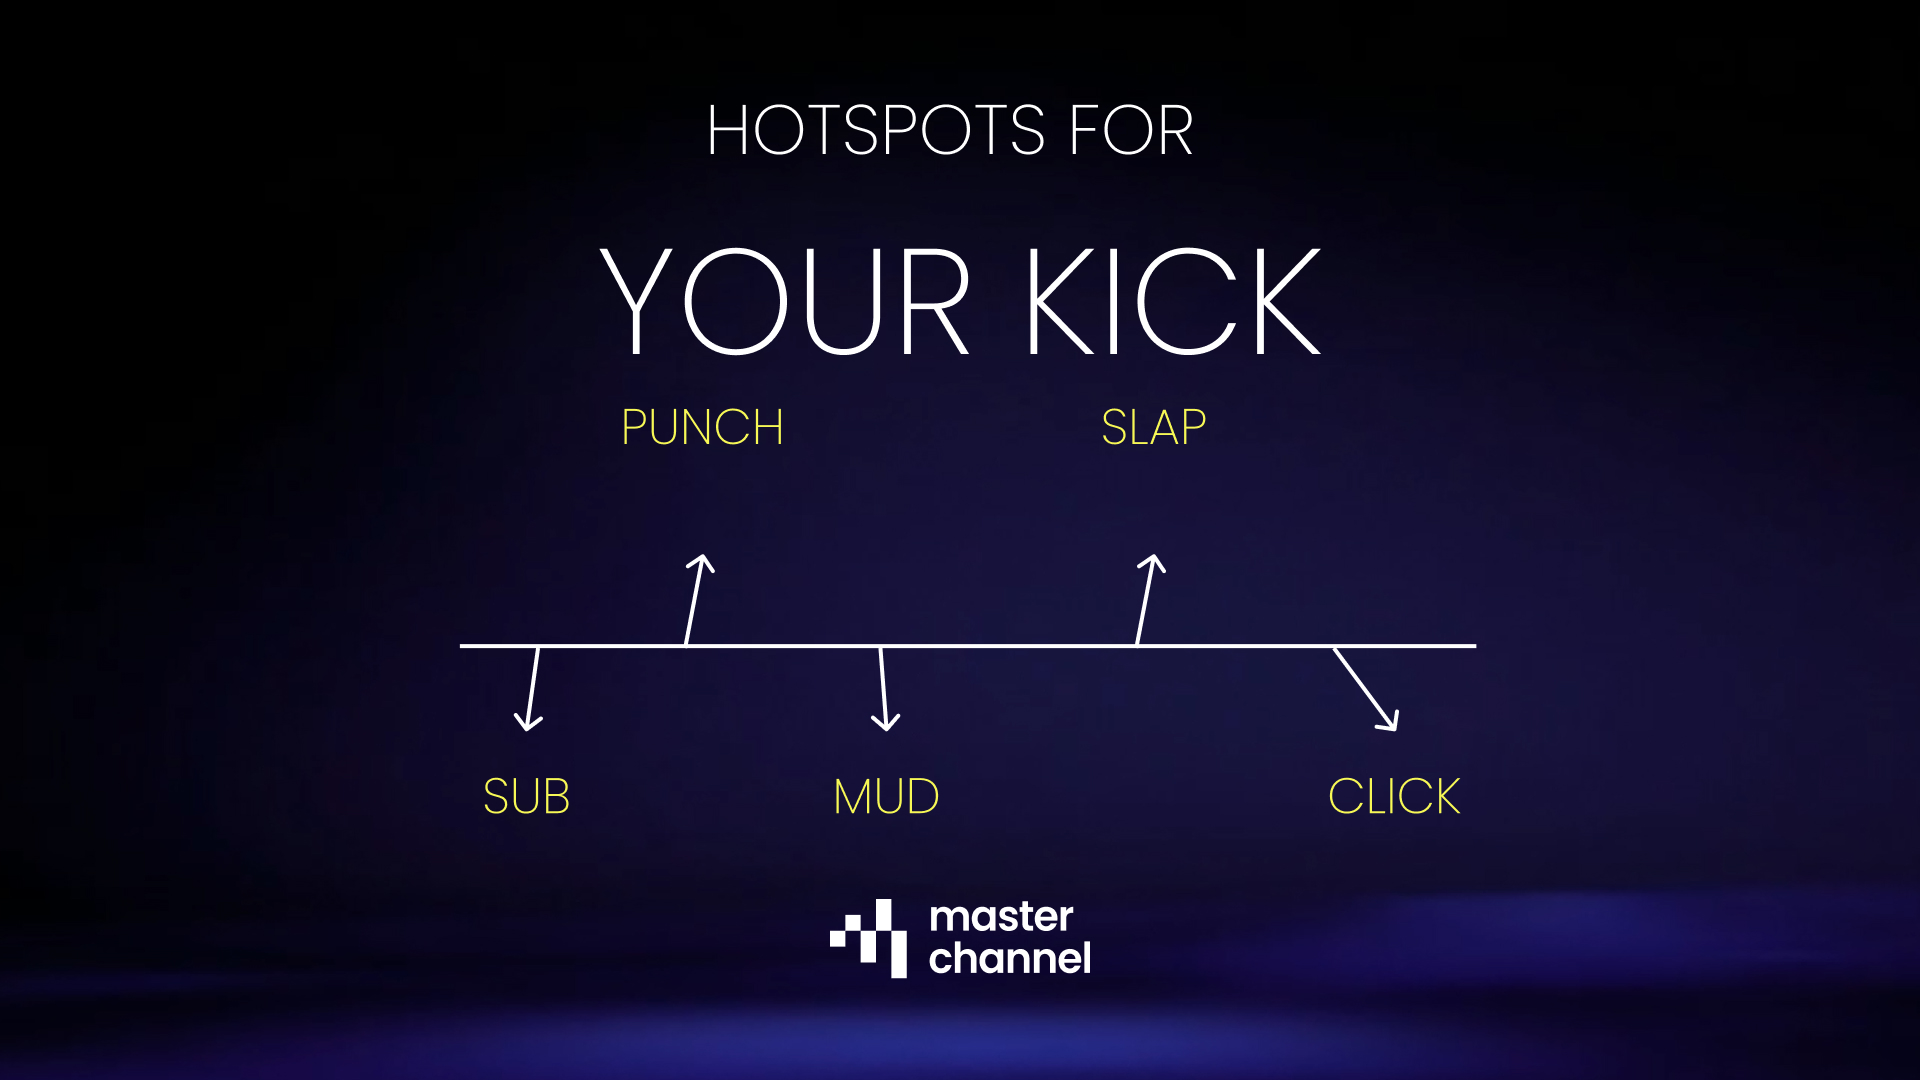
    When you’ve spent hours perfecting the harmonic balance of a lush synth pad or a piano arrangement, the last thing you want is a mastering process that squashes the life out of those frequencies. Masterchannel’s automated mastering service is designed to recognize these harmonic structures. It ensures that your low-mid warmth stays rich without getting muddy, allowing your chord progressions to breathe and resonate with the professional weight of a studio-engineered track.

  • Mastering the PluggnB Sound

    Mastering the PluggnB Sound

    If you’ve been scrolling through SoundCloud or TikTok lately, you’ve likely encountered that distinct, ethereal sound that feels like a dream sequence in a digital world. That’s PluggnB for you.

    A seamless fusion of the gritty, rhythmic foundations of Plugg and the smooth, soul-stirring melodies of R&B, PluggnB is more than just a genre. It’s an atmosphere.

    It’s defined by “floating” melodies, jazzy chords, and vocals with a lot of reverb on it.

    But how do you take a raw track and give it that professional, polished “glow”? Here is the guide on how to master the PluggnB vibe.

    In PluggnB, the 808 is the heartbeat. It needs to be punchy and present, but there’s a catch: it can’t be messy. Because the genre relies so heavily on lush, delicate melodies, a distorted or “muddy” low end will swallow the very atmosphere you’re trying to create.

    • The Goal: Hard-hitting drums that provide a foundation without suffocating the beauty of your track.

    In many genres, the goal is to make the vocals sit “on top” of the beat. In PluggnB, the rules change. The vocals, usually tuned to perfection and layered with effects, need to sit “in” the beat. That’s the trick.

    You want the listener to feel like the voice is another instrument in the synth stack. Achieving this requires a delicate balance of frequency carving and spatial effects so the artist and the production become one single, cohesive unit. Kind of weird, but also cool.

    The secret sauce of any top-tier PluggnB track is the high-end shimmer. This is what creates that “dreamlike” state. Using professional mastering tools like Masterchannel can help you achieve this effortlessly. It ensures your high frequencies have that signature “glow” while keeping your transient drums grounded and crisp.

  • Blending genres? This is how to make sure they sound good together.

    Blending genres? This is how to make sure they sound good together.

    In the modern streaming era, “genre” has evolved from a strict set of rules into a loose suggestion. We are living in an age of fearless experimentation, where Hyperpop collides with Heavy Metal and Lo-fi textures meet Latin Trap beats. And that’s kind of cool!

    But while creativity knows no bounds, physics does. The biggest hurdle for any genre-blending artist isn’t the songwriting, it’s the sonics. When you pull elements from two different worlds, how do you make them occupy the same space without sounding like a cluttered, messy collage?

    The secret to a successful hybrid track is consistency. When you have a delicate acoustic guitar sitting next to a distorted industrial synth, they can feel like they belong to two different songs.

    Strategic use of compression and limiting acts as the “glue.” By evening out the dynamic range across these disparate elements, you force them to react to one another, creating a unified wall of sound rather than a series of disconnected layers.

    Different genres prioritize different parts of the frequency spectrum. A Punk track lives in the “screeching” mids, while EDM is all about the sub-bass.

    If your track attempts to do both, you run the risk of a mix that is either too thin or painfully harsh. Achieving a professional balance requires a master that understands how to respect the weight of the low end without sacrificing the clarity of the mid-range energy.

    Standard mastering presets often fail hybrid tracks because they try to force a “Country-Techno” song into a “Pop” or “Dance” template. It’s a “square peg, round hole” situation.

    This is where Masterchannel changes the game. Instead of using rigid templates, our AI analyzes the unique DNA of your specific track. It recognizes the hybrid nature of your production and builds a custom profile that:

    • Glues clashing elements together.
    • Balances extreme frequency shifts.
    • Polishes the final output into a cohesive, professional sound.

  • Mastering Modern Rock

    Mastering Modern Rock

    From the top of the global charts to the depths of the underground scene, the pendulum is swinging back. Distorted guitars and live drums are making a massive comeback, bringing a sense of organic grit back to our playlists.

    However, if you’re used to producing electronic music, mastering a Rock track can feel like trying to break a wild horse. It’s a completely different beast. The goal isn’t just “loudness”, it’s power!

    You need that heavy impact without sacrificing the “air” and natural dynamics that make live instruments feel human.

    In a heavy mix, it’s easy for the drums to get swallowed by a “wall of sound.” If you over-compress, your snare drum, the heartbeat of Rock, loses its snap and gets buried under the guitars.

    • The Key: Maintaining the “peak” of your drum hits so they punch through the wall, ensuring the listener feels the drummer’s performance rather than just hearing a flat hum.

    The mid-range is the most crowded neighborhood in a Rock song. It’s where the vocals, the rhythm guitars, and the lead solos all live. If handled poorly, this area becomes a “muddy” mess that fatigues the listener’s ears.

    A great Rock master carves out enough space for the guitars to be punchy and aggressive while leaving a clear pocket for the vocals to cut through.

    Rock music is harmonically dense. Overdriven guitars produce complex overtones that can confuse standard digital limiters, leading to unpleasant distortion.

    Masterchannel’s mastering engine is designed to understand this harmonic complexity. Our AI recognizes the difference between “good” guitar saturation and “bad” master clipping.

    The result? Your tracks achieve the competitive loudness of a modern radio hit while keeping the raw, unbridled energy of the original performance intact.

  • Mastering the Afrofuturist Aesthetic

    Mastering the Afrofuturist Aesthetic

    Afrofuturism isn’t just a visual movement; it’s a sonic revolution. From the chart-topping textures of Burna Boy and Tems to the boundary-pushing experimentalism of Flying Lotus, this genre is defined by a beautiful contradiction: the marriage of ancient tradition and the distant future.

    Musically, this translates to a mix of organic, earthy percussion layered with high-gloss, neon synth textures. It’s a sound that is both grounded in the soil and reaching for the stars.

    Here is how you master the sound of the future.

    At the heart of Afrofuturism lies the polyrhythm. Unlike the straight-forward 4/4 kicks of many Western genres, these tracks rely on intricate, dancing percussion layers.

    In the mastering stage, clarity is non-negotiable. You cannot allow the bass to “eat” the transients of the woodblocks, shakers, or talking drums. Every rhythmic element needs to be crisp and distinct, allowing that essential groove to move the listener’s body.

    Afrofuturist tracks are rarely “small.” They often utilize deep, wide reverbs and advanced spatial effects to create a sense of vastness, like music echoing through a high-tech cathedral or across a desert on another planet.

    • The Challenge: Keeping those wide soundscapes from becoming a “wash.”
    • The Goal: Ensuring the spatial elements feel immersive and “expensive” without losing the center-image focus of the lead vocal and kick drum.

    When you are blending experimental textures with traditional sounds, the “finish” of the track is what bridges the gap. You want the organic elements to feel high-definition and the synths to feel warm, not sterile.

    Masterchannel provides that elusive studio-grade finish. Our engine respects the intricate rhythmic layers of your production while ensuring the overall track sounds club-ready and polished. We help preserve the luster of your experimental sounds, making sure your vision sounds like a million-dollar production.

  • Mastering Organic & Acoustic Music

    Mastering Organic & Acoustic Music

    In a world dominated by the “loudness war,” there is a growing movement back toward the quiet, the raw, and the real. Whether you’re crafting a delicate Folk ballad, an Indie-Acoustic anthem, or a complex Jazz arrangement, your goal isn’t to compete with a heavy metal wall of sound, it’s to make the listener feel like they’re sitting in the room with you.

    Mastering this type of music requires something rare in the digital age: restraint. Here is how to give your acoustic tracks a professional finish while keeping their soul intact.

    In organic music, volume is a storytelling tool. If you compress a track until it’s a flat line, you lose the emotional impact of a singer’s whisper or the swell of a cello.

    The “quiet” parts of your song should feel intimate and breathy, making the “loud” moments feel earned and powerful. A great master preserves this dynamic range, ensuring the song “breathes” naturally rather than sounding like it’s being squeezed through a straw.

    Nothing kills a campfire vibe faster than too much digital processing. Over-sharpening the high end or applying aggressive limiting can make acoustic guitars sound brittle and “plasticky.”

    To maintain an organic vibe, the mastering process should be almost invisible. The goal is to enhance what is already there—the warmth of the wood, the grit of the vocal, and the resonance of the room, rather than covering it in a layer of synthetic gloss.

    It sounds like a paradox, but AI can actually be the best tool for preserving “human” imperfections. Masterchannel’s AI aren’t just programmed for volume; they are trained on world-class engineering principles that prioritize musicality.

    When you select an organic profile, our AI understands the assignment:

    • It avoids the “brickwall” look.
    • It prioritizes harmonic warmth over raw decibels.
    • It ensures your track sounds “finished” and professional without ever feeling “processed.”

  • Music Production Tips: Understanding the Different EQ Curves

    Music Production Tips: Understanding the Different EQ Curves

    EQ (Equalization) is one of the most powerful tools in your mixing arsenal. By understanding the different types of EQ curves, you can surgically remove problems or add musical character to any track.

    • Purpose: To cut unwanted low frequencies.
    • The Use Case: Use this on almost everything except your kick and bass to remove low-end rumble and make your mix sound tighter.

    • Purpose: To cut unwanted resonances.
    • The Use Case: If you hear a sharp, “whistling” frequency or an annoying ringing in a snare drum, use a narrow notch to surgically remove just that frequency without affecting the rest of the sound.

    • Purpose: Bringing the sound more to the back.
    • The Use Case: By cutting high frequencies, you can make an instrument sound further away or “darker,” which helps lead elements (like vocals) stand out in the front.

    • Purpose: To boost or cut high frequencies.
    • The Use Case: A gentle boost with a high shelf can add “air” and expensive-sounding clarity to a vocal or acoustic guitar.

    • Purpose: To emphasize certain frequencies.
    • The Use Case: Unlike the narrow notch, a wide bell is used for broad, musical changes—like adding a bit of “warmth” to the mids or “presence” to a lead synth.

    • Purpose: To boost or cut low frequencies.
    • The Use Case: Use this to add a consistent “body” to a thin bassline or to reduce the overall “thickness” of a track without completely removing the low end.

    Graphic explaining different EQ curves: High Pass/Low Cut, Narrow Bell Notch, Low Pass/High Cut, High Shelf, Wide Bell, and Low Shelf, each with descriptions.

    A common rule of thumb is to use Narrow Bell Notches for cutting out bad sounds and Wide Bells or Shelves for boosting the good ones. This keeps your EQ changes sounding natural and musical.

  • Music Production Tips: Understanding Attack, Decay, Sustain and Release

    Music Production Tips: Understanding Attack, Decay, Sustain and Release

    If you’ve ever wondered why a piano note fades away slowly while a drum hit stops instantly, the answer lies in the A-D-S-R Envelope. Understanding these four phases allows you to transform a static beep into a lush pad, a sharp lead, or a punchy bass.

    • The Definition: The time it takes for the sound to go from silence to its peak volume after a key is pressed.
    • The Vibe: A fast attack creates a sharp “pluck” or “hit” (perfect for drums). A slow attack creates a “swell” effect (perfect for ambient pads or strings).

    • The Definition: The time it takes for the sound to drop from its highest initial peak down to the sustain level.
    • The Vibe: Short decay times create snappy, percussive sounds. Longer decay times allow the initial impact to linger before settling into the body of the note.

    • The Definition: Unlike the other stages, this isn’t a measure of time; it is the volume level at which the sound maintains as long as the key is held down.
    • The Vibe: High sustain keeps a sound full and loud (like an organ). Low sustain makes the sound feel more “staccato” or brief, even if you keep your finger on the key.

    • The Definition: The time it takes for the sound to return to silence after the key is released.
    • The Vibe: A fast release cuts the sound off instantly, which is great for tight rhythmic parts. A long release creates a “tail” or “echo” effect, making the sound feel like it’s in a large room.

    A graph explaining the ADSR envelope in sound design, featuring labeled sections for Attack, Decay, Sustain, and Release, with descriptions for each stage.

    Mastering ADSR is the key to cleaning up your mix.

    • Too much release on a bass synth can cause notes to overlap and create “mud.”
    • Too slow of an attack on a lead vocal or synth can make the track feel like it’s dragging behind the beat.

    By visualizing the curve of your sound, you can ensure every instrument has its own space in the timeline of your song.

  • Music Production Tips: Using the Camelot Wheel

    Music Production Tips: Using the Camelot Wheel

    Have you ever wondered why some song transitions sound like a single, continuous masterpiece while others feel like a train wreck? The secret is Harmonic Mixing. By using the Camelot Wheel, you can ensure that the keys of two tracks complement each other perfectly.

    The wheel is divided into two rings that help you identify the “flavor” of the key:

    • The Inner Ring (A): Represents Minor keys. These often sound more emotional, dark, or moody.
    • The Outer Ring (B): Represents Major keys. These generally feel happy, bright, and energetic.

    The genius of the wheel is that it visualizes mathematical relationships between musical notes.

    • Neighboring Numbers: The most compatible keys are right next to each other. For example, if you are playing a track in 8A, you can safely move to 7A or 9A.
    • Bigger Gaps = Higher Risk: As the image notes, the bigger the difference between numbers, the less likely the tracks are to match harmonically. Moving from 1A to 7A will likely result in a “clash” where the melodies fight each other.

    You aren’t stuck in one ring! You can move vertically between the “A” and “B” rings as long as the number stays the same.

    • The Switch: Transitioning from 8A to 8B is a great way to change the energy of a set, going from a moody minor vibe to a bright major uplift, without losing harmonic consistency.

    Colorful Chamelot Wheel illustrating musical keys, labeled with numbers and letters indicating minor (A) and major (B) keys, with a note about matching differences.

  • Music Production Tips: Hotspots for Your Kick

    Music Production Tips: Hotspots for Your Kick

    When you’re EQing a kick drum, you aren’t just adjusting volume; you’re adjusting the feel of the track. By focusing on these five specific zones, you can move from a flabby, weak sound to a tight, driving rhythm.

    This is the area you feel in your chest.

    • The Goal: Provide that deep, sub-frequency weight.
    • The Warning: Too much energy here will eat up your “headroom,” making it impossible to get a loud master later on.

    This is the “meat” of the kick.

    • The Goal: To give the drum its physical “thump” that carries through smaller speakers.
    • The Fix: If your kick feels thin or lacks energy, try a small boost in this range.

    This is the most common problem area for kick drums.

    • The Goal: To remove the “boxy” or “cardboard” sound.
    • The Fix: Most producers use a surgical “dip” (cut) in this range to clean up the sound and make room for the bass guitar or low-mids of other instruments.

    Want your kick to be heard on a laptop or phone speaker? This is where it happens.

    • The Goal: To highlight the sound of the beater hitting the drum skin.
    • The Fix: A boost here adds “slap” and definition, helping the drum cut through a dense wall of guitars or synths.

    This is the high-frequency “snap”.

    • The Goal: To add extreme clarity and modern “pop” to the attack.
    • The Fix: Use this sparingly for metal or electronic tracks where you need the kick to have a very sharp, surgical top-end.

    Graph illustrating frequency 'hotspots' for kick sounds, labeled as SUB, MUD, PUNCH, SLAP, and CLICK, with corresponding frequency ranges.

    A great kick mix is often about balance: boosting the Punch for power, cutting the Mud for clarity, and adding a touch of Slap for definition.